Tuesday, December 31, 2013
A Video to end the year - I hope-guess not
Thursday, December 26, 2013
People Like You; for challenge PPA 185
 I was looking at some of the stamping challenges that I have Not been a part of lately, Wedding, Thanksgiving, Christmas all have kept me busy. I bought myself some Christmas presents and the box arrived the other day. I made a mono chromatic card for this challenge sketch. Vanilla paired with Crisp Cantaloupe I stamped the flower on the back panel of c.cantaloupe (you probably can't see this step) then put down a layer of vellum with the top piece of c.cantaloupe stamped and cut out. I did add some c.cantaloupe color with ink from the stamp pad and a watercolor brush on the large flower and then some dazzling diamonds glitter. Stamped the verse in c. cantaloupe on vanilla and decided to "fussy" cut it out instead of using the punch that co-ordinates with this single stamp. Oh yes I used one of the Delicate Designs Embossing folders on the left side of the c. cantaloupe back panel. I think I'm pleased with this, what do you think? Thanks for stopping by and looking
Monday, December 9, 2013
Christmas Wreath

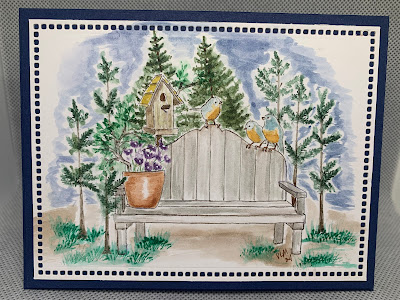
Monday, November 25, 2013
Wetlands
I love how this set can be used for a simple card and a more complex!! Looks great both ways. The first card is super easy just stamped then sponged a little color over. the bottom card was sponged also but I added masking and layered the colors and made the reflection when that was done I stamped the image in black. Love how they both turned out!! Thanks for stopping by and looking.


Friday, November 22, 2013
Busy, Busy, Busy!!!!!!
Wow this is such a busy time of the year for me and to top it off my camera won't download the pictures onto my computer not sure why!! Our second son got married the 9th of Nov. in Texas-beautiful, wonderful, Godly wedding!!! then just 8 days later I had a reception in Ohio for them where we and they will be living. soooo yes it has been busy!!! ( hopefully I'll have someone look at the computer when I host Christmas/Thanksgiving the Friday and Sat. after Thanksgiving Day so I can download some pictures.) Have a blessed day and if I can help with any of your stamping needs I would love to help you!!
I HAVE TO TELL YOU SOMETHING!!!!! MY DAUGHTER-IN-LAW IS WONDERFUL!!
she showed me how to download another way and viola pictures!!! so in honor of such a sweet girl that is now part of our family ( we are so blessed!) here is a picture of the bride and groom, yep that handsome man is my son!!!

I HAVE TO TELL YOU SOMETHING!!!!! MY DAUGHTER-IN-LAW IS WONDERFUL!!
she showed me how to download another way and viola pictures!!! so in honor of such a sweet girl that is now part of our family ( we are so blessed!) here is a picture of the bride and groom, yep that handsome man is my son!!!

Saturday, October 26, 2013
Happiness is...... being able to post!!!!
okay time to do a little catch up, This is a memory book that I made for my mother-in-laws 90th birthday. the family is giving her and her twin a birthday party and I was asked to make the sign in book I made the flowers about a year ago on a trip so I pulled them out and then the hummingbird was colored with copics. thanks for looking
 close up of the top part. made this easel syle so it will fold down over main part if book.
 pages for everyone to sign and write a little note if desired and at the back I added scrapbook type pages with a pull out to add pictures and or cards.


Tuesday, October 8, 2013
Sad Poster :(
I have tried so many times in the last 2/3 weeks to download some pictures of new fall cards and I can't figure out why they won't go from the camera to the computer!!! sooooo I'm sad because I can't share anything new with you right now. I WILL as soon as I can get someone more knowedgable than me to check things out, that won't be someone living in my house sooo I need to take the computer somewhere. Please hang in there and check back in on Vicki's Visions often, thank you! Have a great day!!
Monday, September 23, 2013
Love this stamp set - Wetlands
Masculine cards are something I can always use and that just don't always get made but I can get one made quickly with stamp set. I love how versital it is, it is great for sponging a background and for just stamping. Here I made a paper sunset look, some DSP paper and some cardstock stamped on to give texture. Used Deco Labels framelits and the Stylish Stripes embossing folder to add dimension. Colored the goose with markers after stamping on the layered papers. Oh yes I needed to tell you that I used the new chalk marker for the white up on the neck of the goose. It is available in the holiday catalog, this marker works well on the dark colored cardstock. Since it's Monday I'll say: have a great week!!! :)


Thursday, September 19, 2013
Special Packaging


Wednesday, September 18, 2013
Bridal shower peek
The bridal shower is over!!! We had a great time and so I thought I'd add some pic's... here's the bride to be with her cupcake wedding dress :) I saw this on pintrest and thought it was sooo cute! and then some flowers I made to sit around.


Tuesday, September 17, 2013
Blocks, baby wipes, reinkers= Fall stamping fun!!!!
okay the first card I have to share with you involves all the items listed in the post title! Blocks you say, well yes, doesn't every stamper play with them?! this time though you won't need to add any rubber to it, that's right just stamp your block right in the stamp pad and then directly onto the card stock. Every one you do will have a little bit of a different look and you can either ink it a lot or just a little. Next on this card I used an alcohol free baby wipe to create my own "stamp pad" lay your wipe on a cool whip lid (or something like it) and then add drops of re-inker colors of choice, you will want them close enough to sorta blend the colors. (is that as clear as mud? I hope not) the number of drops really depends on the size of the stamp you'll be using. This is a really fun technique especially with leaves as no two are alike, either in real life or this kind of stamping!

![]()

 Close up of the front two panels
 Thanks a bunch for looking, have a great day!

This next card isn't hard it just has a lot of layers... I'm taking these two card to my monthly group were Margaret lives and I've decided they need a name. hummm I'll have to ask them today to think of something!
This card has a folded back piece on the front to add just a little interest. I used a new stamp set called Truely Grateful it is fall related without being leaves. Either one of these cards would be good to send to men as I didn't use any girly girl colors! That was the request- fall cards, men cards. So what do you think? will they pass... I'll find out this afternoon. :)


 Thanks a bunch for looking, have a great day!
Friday, August 30, 2013
Flashback Friday
This card is made with one of the first stamp sets I ever bought, it is from stampin' up and has 8 different flowers in it, I actually made this card back then. I have had the card in the stamp set so I could copy :) I love the word stamp set also, it has verses in it...it also is from years ago. thanks for stopping by. remember to come back next week and see the pictures of all I've been making for the shower!


Thursday, August 29, 2013
Anniversary Card Request
I'm sorry it has been so long since I've posted, I have been getting ready to have a bridal shower for my future daughter! This is exciting for us since Micah is the first to get married and then it will be my first "daughter"!!!! She is such a sweetheart and we all really love her already.
Each month I meet with two groups of ladies/gent. The request I had for Margarets group was for anniversary cards. This is what I came up with and thy really liked them. The "swing" card I cut for them and made envelopes since they were a larger size.
 the Love on this card was one stamp and we stamped it twice and cut, some of the ladies used all blue and then they all had enough letters to make another card at home.
 Closed and then opened below!
 this kind of card is sooo easy to make now that stampin' up has come out with a die that cuts the swing part.(course I didn't have them at the making of this card) but even without the "die" it isn't too hard. If you'd like to learn how I could show you, just contact me and I'd love to come to your home(if you live close enough :) and share with you and your friends!!! Have a great day and thanks for stopping by and looking. If you come back next week I'll have pictures of what has been taking up my time - I have been in my craft room just not taking the time to post, sorry! Don't forget to come back - you won't be sorry :)
Friday, August 16, 2013
Bridal Shower invitations
Wow I can't believe that I haven't posted anything for almost a month!! I have been stamping a little bit but this time of year I'm mostly canning...... green beans, soup beans, peaches, red beets, freezing corn, plenty of tomatoes, made sauce, pizza and plain, tomatoe soup, will be doing more tomatoes!!! We've had corn and I've frozen about 50 bags, yellow squash and zuchinni are doing well, I even have some spaghetti squash growing, it's the first time we've planted that.
Okay so on to stamping, I have been doing a little. Right now I'm working on Bridal Shower cards, Micah our 2nd son is getting married in Nov. and I'm having a shower when his fiance - Stephanie and her mother come in Sept. I saw something like this on pinterest - this is my creation for invitations for the shower. Let me know what you think. :)
![]()


Okay so on to stamping, I have been doing a little. Right now I'm working on Bridal Shower cards, Micah our 2nd son is getting married in Nov. and I'm having a shower when his fiance - Stephanie and her mother come in Sept. I saw something like this on pinterest - this is my creation for invitations for the shower. Let me know what you think. :)


Friday, July 19, 2013
Flashback Friday
One of the first stamp sets I bought and this card was made years and years ago. I may have to pull this set out and add some ink to them :) !! Have a great day. don't forget - I CAN show you how to make beautiful hand made cards AND you do not need to be artistic!! (the gentleman in my stamping group even told me this last month!! he was amazed how easy it is!!!) Now how about you? I'm sure once you try it you too will see just how easy and rewarding it is to make a handmade card for others!! I would love to help you. You can contact me at vmilyard@gmail.com Hurry now your just one posting away from creating fun!!


Thursday, July 18, 2013
Wax paper resist

1. cut a piece of wax paper the size of your embossing folder
2. take 2 pieces of shimmery white cardstock (glossy works great if you have any)
3. sandwich the wax paper between the shimmery cardstock (or the glossy sides)
4. put your sandwich between a piece of scrap paper (to protect your iron from the wax)
5. set your iron on the cotton setting then press and hold for 10 seconds move and press and hold again. DO NOT run it back and forth as the image will not be as crisp and nice.
6. Take the wax paper our and now you have two pieces with the design of your embossing folder - no they are sort of like a positive and one negative.
7. Using the stamp pads and brayer add color to the piece, as you add the color the design will appear, when finished rub an old cloth or paper towel over to get the extra ink off.
8. NOW makd a card, use as a background or cut and use in any way you like.
Tuesday, July 16, 2013
Christmas in July
I just found a new challenge site and since they didn't have many players thought I'd like to submit a card. I was in the "need" to stamp anyway!! :) I combined 2 old sets that I absolutely loved with some of the current. Stamps: the Sounding Joy, First Christmas
Cardstock; Midnight Muse, whisper white
Ink, Midnight Muse stamp &marker, Illuminate glimmer st.pad
Accessories; Mosiac punch and embossing folder, pearls
It is hard to see the Illuminate stamping on the midnight muse, used the big star with the words to the song Joy to the world. The "Christmas love" was gotten from the stamp used on the inside of the card- picked the words I wanted and used a marker to color and stamped one word at a time. Thanks for looking and on this HOT day in July think of December and snow maybe you'll feel cooler :)
 Wanted to show the inside of the card. I embossed the front knowing fully that it wouldn't be seen much on the front, but oh my does it ever make the inside of the card POP out at you!! why have boring when you can have ohh,la,la.


Cardstock; Midnight Muse, whisper white
Ink, Midnight Muse stamp &marker, Illuminate glimmer st.pad
Accessories; Mosiac punch and embossing folder, pearls
It is hard to see the Illuminate stamping on the midnight muse, used the big star with the words to the song Joy to the world. The "Christmas love" was gotten from the stamp used on the inside of the card- picked the words I wanted and used a marker to color and stamped one word at a time. Thanks for looking and on this HOT day in July think of December and snow maybe you'll feel cooler :)

Here is the sketch challenge;
Lets go fly a kite.....
 this is a fun card and easy to make it uses 2 quarter sheets of paper. score at half inch and inch on each side decorate to your liking then adhere the two edges together to the holf inch mark on both . The inch score lines are folded opposite to create the "window box" look. This card will lay flat to send and will stand up when pushed open a little. Have fun I'd love to see your ideas!!
Friday, July 12, 2013
MOJO 301 So Grateful
 I've been thinking about this sketch all week and today it hit me!!! you know like a light bulb coming on!! My bosses wife if out of the country so I thought why not make him a missing you card. Couldn't find a missing you saying so I used the I'm So Grateful There's You In The World saying - colored with the marker so not to get the outside oval. Heart framelits and heart embossing will help her know she was missed and loved :) I'm still waiting for my molds for the clay and decided to add a handmade clay rose. Monochromatic card - using whisper white and strawberry slush (new In Color) thanks for taking a peek!
Flashback Friday
My group asked for Anniversary cards I came up with this one and decided I rather liked it - an oldie set the LOVE letters were stamped twice in two different colors and then cut apart. 2 embossing folders and the zing to this card (Just love the embossing folders!!!) EASY EASY EASY!!!


Thursday, July 11, 2013
Flip Flop Card
 this is a fun way to make an unusual card.
1. mark the center and half inch on either side of center on your cardstock and framelit
2. lay the framelit on the cd.stock with the centers matching on to of a cutting plate
3. take your second cutting plate and line just the .edge of it up with the line half inch from center. Carefully holding it in place run this through the big shot. If you did this right it should only have cut the side of the framelit.
4.. Now repeat with the other side when this is done there should be an inch space in the center that was not cut this is where you fold. one side forward the other backward
5. when you open the card the middle shape will flip around as seen in the next picture.
this can be done with all shapes and sizes, just remember to leave a center section that is not cut!!

Tuesday, July 9, 2013
Clay flower card and framelit debossing!!!
here they are as I promised just love making these roses and calla lillies!!!
 this is a swing card using the new framelit - Deco Label I really like this shape!
 On this card I tried a new technique that I saw on pintrest - use your framelits to deboss and no cutting, it is easy here is the sadwich you use
 this is a swing card using the new framelit - Deco Label I really like this shape!
 On this card I tried a new technique that I saw on pintrest - use your framelits to deboss and no cutting, it is easy here is the sadwich you use
1. cutting plate
2. Silicone rubber
3. Card stock
4.. Framelits placed upside down (cutting UP)
5. scrap cd. stock
6. cutting plate
all this on tab 1
Monday, July 8, 2013
Stampin' Ups new poly-clay
Well it's like this my clay came in and the molds were on back order so what's a girl to do when she wants to play??? I went to youtube and found a tutorial on making these roses no I didn't make this up myself, I'm sooo glad people are willing to share their great ideas!!! After making the roses I thought hey why not calla lillies?? or lillies?? this is my attempt at clay flower making hope you like them!!! What is really awesome about these flowers is that after they are dried they are still soft and can be squeezed without smashing them, just let them sit for a good 24-36 hours and they can be added to cards, come back tomorrow and see the cards.

 a dear friend pointed out that callalilles have yellow centers. I have since corrected my mistake thanks Carole!


 a dear friend pointed out that callalilles have yellow centers. I have since corrected my mistake thanks Carole!
Saturday, July 6, 2013
Misty Morning
I told you I liked this stamp set in the previous blog. This one uses smokey slate and calypso coral as the main cardstock colors, once again a variety of colors were sponged for the background, and some coloring with the markers. I finished off the card with the bakers twine and then made a clay flower. YES this is new and when I received mine the molds were on back order so what was I to do?!? Had to give this new awsome product a try so I made roses by hand (I saw a tutorial) but it was fun and I have been making lots of different colors. Love this sketch, sometimes it is nice not to have so many different layers!! Thanks for stopping by, and I hope you'll come again.


"Hiding"
I have decided that I really am going to like this new hostess set - Simply Sketched it come with 3 beautiful designs and 3 sayings, oh so versatle!!! You can get it just by hostessing a party, being the hostess gives YOU all the freebies!!! wouldn't you like to host a party??? I'd love to come and share my LOVE of stamping with you and your friends, the new catalog has so many stamp sets - something for everyone. We also could be considered your "one stop shop" place as all Stampin' ups colors match, no more guessing if your 2 reds (cd. stock and st. Pad) will match, OURS DOES!!!
This card was made just because I haven't done any sponging lately and wanted to on this WET Saturday!! Then realized it would work for the challenge. Thanks for looking!
 Stamp Sets; Simply Sketched, My Friend
This card was made just because I haven't done any sponging lately and wanted to on this WET Saturday!! Then realized it would work for the challenge. Thanks for looking!
 Stamp Sets; Simply Sketched, My Friend
Card Stock; A. Artichoke, S. Starfruit, B.Black, W. White
INK; assorted st. pads for sponging and markers for coloring
Accessories; Lattice Die, black scallop ribbon(retired- sorry don't have new)
Thursday, July 4, 2013
Happy 4th of July
Designed this card for my stamp group - always keep things fairly simple for them. They wanted something summer and patriotic last month. The previous post showed the summer card today since it is the 4th seemed appropriate for this card.


Wednesday, July 3, 2013
A blast ffrom the Past: Strawberries
Can't believe it has been a week, I have been busy with strawberries, picked, stemed. washed. made jam - let's see the count is now at 38 pints. What can I say but 5 men in my house like strayberry jam
So this card is from a couple weeks ago, I designed it for my group of older ladies and gent. They wanted something summer and patriotic. Here's the summer one thanks for looking I have to keep the cards for this group fairly easy.

So this card is from a couple weeks ago, I designed it for my group of older ladies and gent. They wanted something summer and patriotic. Here's the summer one thanks for looking I have to keep the cards for this group fairly easy.

Tuesday, July 2, 2013
Congratulations Nathan and Jennifer
sooo sorry I haven't posted anything since June 11 when I saw that date I couldn't believe it!!! My only excuse is that summer is a busy time around here, garden, hay - cutting raking baling unloading I'm not always involved in all that but with all the boys working now seems I helped more this year than previous. Well onto my card for today - Wedding bells were heard a couple weeks ago, a nephew got married it was a late wedding with the reception at a park and they had fireworks!! WOW
 Mr. & . Nathan Milyard
 Mr. & . Nathan Milyard
used framelits to cut hearts, added some swirls of pearls(non st.up) made the flowers with a 5 petal punch and formed each layer to make it looke like a rose. Fancy fan & stripes embossing folders
Thanks for looking, if you'd like to learn to make great looking cards that are easy and eye catching just contact me!!! I'd love to show you how easy it is - REALLY !!! (vmilyard@gmail.com )
Tuesday, June 11, 2013
MOJO Monday meets Mosiac Madness
Visiting a dear stamping friend yesterday so this Monday challenge was finished on Tuesday :)
At first I thought flowers and had some paired up with the background paper but it just didn't strike my fancy sooo I went with the Mosiac Madness stamp set. I paper pierced the mosiac punch shape by hand. Layed a punched shape down then pierced around it after stamping the inside. thanks for coming to look and I hope it inspires you to try a challenge even if you do give it a "twist".


At first I thought flowers and had some paired up with the background paper but it just didn't strike my fancy sooo I went with the Mosiac Madness stamp set. I paper pierced the mosiac punch shape by hand. Layed a punched shape down then pierced around it after stamping the inside. thanks for coming to look and I hope it inspires you to try a challenge even if you do give it a "twist".

Stamps Mosiac Madness: Whimsical Words(discontinued)
Card Stock; Daffodil Delight, Pool Party Whisper White
Accessories: Mosiac Punch, Corner rounder, Piercing tool and mat, Quatrefancy DSP

Subscribe to:
Posts (Atom)
Just because cards
I have been wanting to use some of my Art Impression Stamps lately and decided that today was the day. I used a new set, It’s one of the wa...
-
A new year and a new blog hop the second Saturday of each month. This is going to be so much fun and I am so hoping I can do this every m...
-
 Welcome to the first blog hop of the year for The Joy Of Sets! Thank you for hopping over. I decided to make a gift bag and card a...
 -
 Decided to check out some challenges today as I'm stuck at home. Living back a lane I often get snowed in. The trucks make it out but ...
