Tuesday, February 27, 2018

Challenge 358 Flowers

Our sketch today is one that I believe lends itself to many ways of using it.  The three circles on the right side can be changed up and that is just what I did.  I'm wondering what your take on this card will be?  Hope you join in and enjoy making something with flowers.

 Stamp set - Hello Friend      (All supplies are Stampin' Up)
Ink - Marina Mist, Lemon Lime Twist, Berry Burst,
Card stock - Whisper white, Copper foil
Extras - Copper and White embossing powder
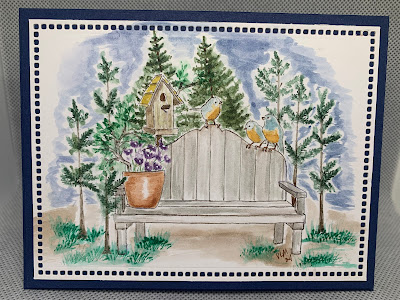
FYI - to make the background I embossed with the white then smashed the marina mist stamp pad on my stamping mat, spritzed it with water then tapped the whisper white piece into the ink till I had the look I wanted. Heat set to dry not because I had to but because I didn't want to wait for it to dry.  Since I didn't use water color paper and the whisper white is thinner I did have to put books on top of my piece to flatten it out so maybe I should have used water color paper oh well it worked  I just used plenty of adhesive behind it. I just love how that back ground came out with all the different shades of blue and really like all the white spots in it. I know I say it every week but be sure to check out all the other Designers, we all all different and that is what makes it so fun - seeing how everyone uses this sketch.  just click HERE and you'll be taken directly there.

          Optional Theme: Flower Power


Friday, February 23, 2018

Waterfront Stamp Set - LOVE, LOVE, LOVE!!!

Oh my I so love this stamp set!!!  I have so many cards that I send to ALL the men in this family and this stamp set has made it so easy to make masculine cards.  Every now and again I'm going to post one and not necessarily write up anything for it. Some of these cards will be ones that I looked at on pinterest and will CASE - if your not familiar with this it means Copy And Share Everything. This first card though is my original and  I thought I'd tell you that I stamped on watercolor paper and used an aqua painter to move and blend the color around a little bit. 


  1. I stamped the ground spot and cabin first.

2 Masked the cabin (stamped on post it paper, cut out, covered cabin)

3.Stamped the mountains with repeat stamping and overlapping till I had the I wanted.

4.Used the aqua painter to blend the color around a bit on the mountain and the ground.  If the paper        gets to wet you'll want to let it dry or as I did because I didn't want to wait, dry with the heat gun.

5.Stamped the trees - haven't taken the mask off so the trees will appear behind the cabin. I only inked      up the top of the trees Not the trunk below the branches.

6.Stamped the water with repeat stamping and over lapping with a darker blue at the bottom.       Blended  the inks with aqua painter, dried and then used a white pen to give the ripples look. 

7.Stamped in the sky, then blended the color out a little leaving white spaces to look like clouds.

8.Took mask off the cabin and colored in with a marker.

9.Finished the card by Added the sentiment of my choosing in the water.  Mounted on black then colored card stock.

We'll that's it.  I hope that it's all clear if there is something you don't understand and would like to know about just leave your question/comment in the comments section and I'll get back with you.  Have a wonderful day.


Tuesday, February 20, 2018

Happy 50th Birthday or is it?????

Challenge 357 is a fun one and I sure had fun with this one!!!  I DID NOT follow the sketch, but did the theme!!!      Shaker Card!!!!   :0)

So it's like this, my son commissioned me to make him a card for a friend who was to be turning 50 and he wanted something specific written on it....but as it turns out he wasn't 50 this year!!!!!! he was only 48!!!!!    tee hee    Oh my talk about egg in the face... He gave it to him anyway and he loved it!              Now this card was a tri-fold card to accommodate the wording that my son wanted on it. Since it was hand delivered I didn't have to worry about the size.   keep looking I have three photos for you.

I used lots of thing to make this card so I'm not going to list them, if you are interested in something you see just leave me a comment and I'll get back with you and try to tell you what I used.  If you're needing a card sketch inspiration just check out all the designers cards by clicking HERE.

Optional Theme: Shaker Card 


Tuesday, February 13, 2018

Card Sketch challenge 356 theme: polka dots

Good day to you, have you been waiting for a card sketch well today we have one for you.  Have you ever  bought a stamp set and then it has sadly sat, and Sat, and SAT without you opening it up and inking it???  Well that is what happened with this stamp set. I really have been wanting to use it and when I saw this card sketch I thought of it and TADA!!!!  I really like how it turned out!! I may add a vertical happy birthday sentiment to this on the right side OR I may just leave it blank. What do you think?
Sometimes it can seem hard to follow exactly what the sketch has but I always try to remember that all the pieces can be changed to fit my needs. So with this card  I did a 90 degree turn and then the large vertical piece I narrowed down (my polka dot piece) and the two pieces with rounded edges I actually made a shape(flowers) coming off the top of the top layer, the horizontal piece turned into ribbon. Always remember that the sketch is just a starting place and as you work on your card you may decide to change it up a bit and that's okay. So here is my take on the sketch below.


Stamp set - Flirty Flowers
Inks - Black tuxedo stamp pad, markers- pastachio pudding(retired) pear pizzaz, peekaboo peach,                     coral,tangerine tango
Card Stock - Crumb Cake card base, Whisper white top 
 Other           retired DSP,  peekaboo peach ribbon


Optional Theme: Polka Dots 


Click HERE to go see all the other designers takes on this sketch and then why don't you take a few min. okay maybe more that a few ;)   and join in on the fun of creating a card that you can send to someone. I'm sure that they will appreciate you taking the time and thinking of them and it would be relaxing for you - I hope:0)                                             


Tuesday, February 6, 2018

TSOTuesday color challenge

Hey there, it's Tuesday again.  You know, that day comes around every seven days😄!   We here at Try Stamping On Tuesday have a new challenge every Tuesday. This year we've been trying some new types of challenges, have you been following for awhile? Let us know what you think, do you like the mix up or do you wish we were still just having card sketches for the challenges. If your new to  I us, welcome and so happy to have you, what do you think? Personally I like the mix up, it adds more variety.
This week is our first color challenge, no card design, that means any style card you want, all we suggest is to use the colors, but as always that's just a suggestion, if as you making a card a different color jumps out and says use me, use me!! Well then you better and please share your card with us 😏.
Okay here are the colors suggested to use...         
             
                                  
Here is my card.....         

What do you think?  I just received this new stamp set and die bundle from the Occasions Catalog. I used the watercolor pencils to add color to the roses. I did use a few items that are not stampin' up - the word die - smile and the "window layer"   I do hope you'll join in on the fun and check out the other designers - you can find them all at Try Stamping - just click on those words and you'll go directly to that page.  Have a wonderful week, next week we'll be back with a card sketch.
 

Thursday, February 1, 2018

Feb Technique Challenge - Sponging


Ok this was right up my alley!!!! Thank you to Sarah H. for this one,! I really do love making cards with sponging on them and I have two for you, both very different.

This first one is a Penny Black slapstick stamp,  I stamped just part of this one using my Misty since I do not have my Stampin' Up Stamparatus yet - so looking forward to getting it!!!  After inking and stamping the part of the scene that I wanted, I used mini stamp pads and markers. I then used a versa mark pad and clear embossed it so I could sponge in the sky. 


Here is my second card, I will confess I made this one a while ago but don't think I ever added to my blog so I thought I share with you,  It was to look like a "misty' sky, what do you think?


Homemade DSP

 Have you ever made your own DSP paper? I have a few times, there’s a YouTube channel called Artful Stamping with Ruth that I enjoy watching...