
Wednesday, April 25, 2018
Waterfront AGAIN!
Just finished putting this together today. I saw a You Tube video on this and wanted to give it a try. I really do like this stamp set you can do so much more with it than meets the eye.

Tuesday, April 24, 2018
TSOT #364 Butterflies
Hello and a good day to you. Can you believe that it is the end of April already? Time sure flies!!! When I saw this optional theme butterflies I just knew that I had to some how use this background piece I made a while back with my color burst. I was playing around with them and this is one of the finished pieces. If you look real close you'll see the raised butterflies on the base of the card. I used an embossing folder to achieve this look. When I first finished it I wasn't sure I liked it but now that the card is done I may have to try some other folders.
I took the liberty to turn the card so my panel with the three butterflies would go across the card, I didn't add a sentiment but plan to do that on the top of the yellow strip when I decide who will get this card and what the occasion will be. Thanks for stopping by and we really want you to join us with one of your creations.

 Try Stampin" on Tuesday click here and it will take you to the web page with all the inspiration from the Design Team.
I took the liberty to turn the card so my panel with the three butterflies would go across the card, I didn't add a sentiment but plan to do that on the top of the yellow strip when I decide who will get this card and what the occasion will be. Thanks for stopping by and we really want you to join us with one of your creations.
 Try Stampin" on Tuesday click here and it will take you to the web page with all the inspiration from the Design Team.
Tuesday, April 10, 2018
Color challenge #2 for Try Stampin on Tuesday

This is a lovely color combination. You could make it soft or bold, I sorta did an middle of the road. I hope you'll try this out and have fun doing it!
I used a Stampin' Up die to cut the Happy birthday. I cut a foam and the one on the card front that I stamped. The foam one gives lifts the words up so they stand out and it's not going to be spotty like it would be if I'd used dimensionals and tried to piece them on. Thanks for stopping by, I'm off to be a second pair of hands and help daughter-in-law. 😊

Wednesday, April 4, 2018
IT'S A BOY !!!
Joseph Wayne Milyard born April 1st at 2:15 am delivered by his father at home as the midwife was still in route!
8# 1 oz 22 inches long


Family of 5

Tuesday, April 3, 2018
Gate Fold with a twist for TSOT # 362
This was a fun card to make, I was on Pinterest one day and saw one like this so I decided to put my spin on this fold. I'm hoping it will pass for the Gate Fold challenge (with a twist). There are so many talented people stamping and sharing on places like Pinterest, Facebook, and Instagram. We at TSOT are trying to expand, we have a Pinterest page and are trying to add to Instagram, have you been to either of those two places. Of course it isn't necessary for you to add there just on out TSOT challenge page. Do you stamp? or just look at what everyone else is doing and think I'd like to do that! Do you share what you stamp, I know that is something I should do more of. It seems to take time out of the very busy days I have. Is that your excuse? I guess that I should try to get on for a certain amount of time each day or realistically every other day and add my visions. I'll try to do better!!! How about you trying by adding a card to this challenge?! We'd love to see what you come up with for this type of card :0)


If you can't tell from the picture I made this card to open diagonally. The circles are added on both sides and hang over the opposite side, overlapping to help hold it closed. It's quit easy to do, just cut your card stock from corner to corner then score the long side at 5 1/2 and the short side at 4 1/4 give the folds a good crease making sure that they line up nicely. While your making one you might as well make two since one piece of card stock makes two card bases. The diagonal layers were cut to 4x 5 1/4 then cut diagonally - be sure to cut the pattern paper the right direction for which place your adding it - (ask me how I know) especially if your wanting a certain side.
Stamp Set - Bella and Friends, sentiment from Beautiful Bouquet, inside- Birthday Wit from Occasions Catalog
Card Stock - Pear Pizzazz, Soft Sky, Soft Suede Whisper White
Miscellaneous - Coffee Break Designer S. Paper, colored pencils, Balloon Bouquet punch, Layering Circle Framelits
Well there you have it - my vision on this wonderful challenge, I do hope you'll join us, make a card and add it. Don't be like me and put it off you may be one of our top three winners with the chance to win our badge to display on your blog!!

Sunday, April 1, 2018
April technique - Partial Die Cutting
I had the privilege of being the "teacher" for this months technique - I have made a few cards with this technique and always love them. Many of us know that die cutting is a fun and fabulous was to spruce up a card. I tell all my customers that the Big Shot to the stamper is our "Power Tool" in the craft room!!! Have fun trying out this technique - it really isn't hard!!

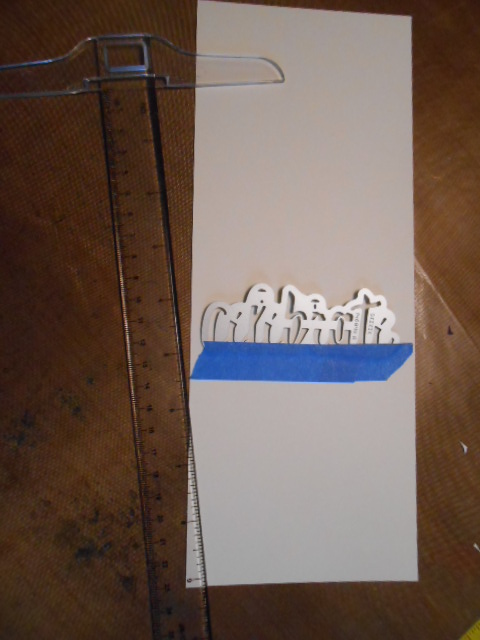
 2. I like to use painters tape to hold my chosen die in place but I have found that it can rip the paper so I press in on my clothes before putting down. When you do this you need to remember that the words/shape will be above the fold. I use a “T” ruler to help line this up straight and to keep the top of my chosen die right at the 5.5” so my card will fit in the A-2 envelope. Placing the painters tape right where you want to cut will help in step three.
 This next picture shows how to put your cardstock and plates on the big shot. I have found that the best way to do this is to put the cardstock with the painters tape right at the edge of the platform and place the cutting plate on top lining up its edge with the painters tape which is where I want it to cut. Run through the BigShot making sure that the plates don’t slip and cut crooked. (I like to run the plates through with the cutting last – it is easier to be sure the plates won’t move on you).

Pop up Partial Die Cutting
1. Decide what you want to use at the edge for your partial die cutting, this can be words or a shape. DO NOT SCORE CARD BASE!
 2. I like to use painters tape to hold my chosen die in place but I have found that it can rip the paper so I press in on my clothes before putting down. When you do this you need to remember that the words/shape will be above the fold. I use a “T” ruler to help line this up straight and to keep the top of my chosen die right at the 5.5” so my card will fit in the A-2 envelope. Placing the painters tape right where you want to cut will help in step three.
 This next picture shows how to put your cardstock and plates on the big shot. I have found that the best way to do this is to put the cardstock with the painters tape right at the edge of the platform and place the cutting plate on top lining up its edge with the painters tape which is where I want it to cut. Run through the BigShot making sure that the plates don’t slip and cut crooked. (I like to run the plates through with the cutting last – it is easier to be sure the plates won’t move on you).
4. Now take the ruler (my “T” ruler works for this to keep everything straight) and BETWEEN the letters or either side of the shape, score the card—DON”T score across the letters or shape - this will help the letters/shape to stand up and not fold back.


5. Gently fold the card now and then you’ll need to cut the bottom of your card stock off. The letters/shape will be attached to the front of the card – how cool is that!!! :0)
6. To finish my card I die cut the word YOU 5 times and then glued them together. In the first picture with the words and pink washi tape I show that I tape the word onto the cardstock. My reason for this is that I’ve been cutting with the cut side of the die up so that means I have to have the die laying on the magnetic or precision plate then the cardstock and lastly the cutting plate. I watched a video from ?? and she said that you will save your cutting plates from wearing out and cracking if you do it this way. The magnetic and precision plates do not have any give to them whereas the cutting plate does. Since I’ve been doing this I have noticed that the plates don’t warp so badly – I flip the plates to help with this but I had been doing that , yes they still get cut but that can’t be helped.
7. To finish the card I decided to use a die to cut a window in the front of the card to place the die cut YOU inside. Decorated the front and oh yes I did place a piece of colored card stock on the inside of the card so when opened you wouldn’t see the letters cut out of the back of the card.
Subscribe to:
Posts (Atom)
Just because cards
I have been wanting to use some of my Art Impression Stamps lately and decided that today was the day. I used a new set, It’s one of the wa...
-
A new year and a new blog hop the second Saturday of each month. This is going to be so much fun and I am so hoping I can do this every m...
-
 Welcome to the first blog hop of the year for The Joy Of Sets! Thank you for hopping over. I decided to make a gift bag and card a...
 -
 Decided to check out some challenges today as I'm stuck at home. Living back a lane I often get snowed in. The trucks make it out but ...
