Some of you may know that I am on the Design Team for Creative Card Crew. Mari is the owner and I was checking out her blog today and ran across a couple challenge sites that caught my eye. I'm entering a card in the Alphabet Challenge blog. The letter and challenge this fortnight is K for Kind Thoughts. Every two weeks this changes (previous was J for jewels).
I have been wanting to do something with this new Hostess Stamp set from Stampin'Up (I'm a demonstrator if you need anything I could help you with that :0). The sentiment is from another new set.
Do you have a friend or relative that you enjoy being with but live far apart and don't see each other very often? I do, a sister. The sentiment on this card outside and inside says it all!! (Wonder if Beth will be seeing this before she gets the card in the snail mail.)
I took some pictures of the step by step when making this card so if you look below you'll see that. (Be sure to leave a comment if you want to see more tutorials)
K for Kind thoughts (be sure to look at the inside of the card for the finished thought)

Inside

Picture and written tutorial:
 |
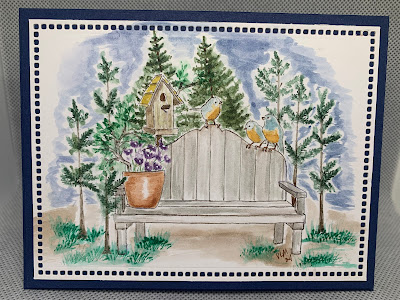
| I stamped with versa mark and embossed with Stampin' up detail black. Colored inside the embossing with bleach that I put in a watercolor brush that was bought only for bleach. I used Soft sky card stock from Stampin' Up it turned the card stock a pinkish color. Different colors of card stock will bleach out to different tones so be sure to try a scrap before starting this technique. When COMPLETELY dry!! color with medium of your choice. On the previous posting I did this same technique on crumb Cake (Stampin' Up) It was a yellow tone. |
 |
| I used stampin' up markers and a watercolor brush, colored on a cool whip lid then picked up the color with the brush and applied, kept adding colors to get the look I wanted. Because this was embossed I didn't have to worry to much about the color getting out of the lines. (The previous posting was not embossed, it was a digi image printed on the computer.) |
 |
| when I finished coloring I had to let it dry. |
 |
Added a mask that I made using a full adhesive sticky note. Then sponged white pigment ink to look like clouds. Wish I would have taken another picture here. I used a common item that we all have in our homes to make the clouds..... a paper towel!!! ok I went and dug it out of the trash (picture below)- it is so simple to do. Just rip, lay on card stock and then sponge. I sponged all the white then went back in and added just a touch of smokey slate gray to the base of the clouds. Wanted just a touch of gray color so I colored on the lid first and picked up with sponge, sponged off to be sure it wasn't to dark. I felt this just added some depth. |
 |
| water colored butterflies, cut and adhered to card. (I colored 2 thinking I might need then didn't oh well I have on for another project.) |

Finish the card. Added a pink ribbon (to cover a smudge) and some signo white to the stamens of the flowers, put focal image on a piece of black then popped all up on card base of Soft Sky. Well that's it wasn't hard maybe just a tad time consuming- I guess I could have used the heat tool to dry things quicker but I was doing laundry while I stamped. (maybe I didn't have to plead the 5th??? tee hee)
If this tutorial was helpful PLEASE leave me a comment - anyone doing this knows that it is time consuming and I really would like to use my time well. So if you gained from this and would like to see more, let me know.
I Love sharing my Visions!!! Today I'm off to the corn patch (should already be there but wanted to finish this). Have a great day!


What a lovely design, Vicki - I'm sure your sister will love it. A great tutorial too. Thanx for sharing with us at the Alphabet Challenge.
ReplyDeleteHugz, Jan (DT) xx
Gorgeous card Vicki! I love that image and your beautiful watercoloing, fab tutorial too! Thanks for joining us at Alphabet Challenge Blog!
ReplyDeleteTammy x