New products can be so much fun to play with in the craft room!! I received some of Stampin' Ups new Fall and Winter product. Their "Handmade for the Holidays" catalog will available from September 1, 2015 - Jan. 4, 2016. Eeeekkkk did I really just type 2016, seems like just yesterday that 2015 was new and fresh. I guess time just keeps moving on, many schools starts this week and yes before we know it, it will be Thanksgiving and then Christmas. Have you been thinking ahead and doing any planning for those Christmas cards? This new catalog has a wonderful variety of products to pick from and many are offered as bundles(stamp set and dies to match) at a discounted price from buying separately, if you are interested in a catalog just leave me a message in the comments with your e-mail address and I'll help in any way possible.
Okay how about a peek at one of the new products!! I bought this one as a bundle (yes I can pre-order one of the perks of being a demonstrator). I used the new Hearth and Home Thinlits Die. This window comes with a window box also (which I didn't use). The stamp set has 6 images and 7 sentiments.
Thanks for stopping by and I do hope you'll leave me a comment. I linked the catalog images so you click on the catalog name or the Thinlits Die name to see more from this wonderful catalog.
Welcome to my little corner on the web. I want to share with you projects I make and at times share how easy it is to copy! Yes you are to copy any and all you see here, some you'll like and some you may not care for but I hope that won't send you away for good. Let's have a GREAT time stamping and creating.
Tuesday, August 11, 2015
Wednesday, August 5, 2015
Sparkle!!! Creative Card Crew Challenge
Hello all, yes it is that time again! Every two weeks the designers over at Creative Card Crew have new projects to show you and to challenge you to have fun and play along. The added bonus is that everyone who enters will have a chance to win a prize. We have a good number of sponsors that offer the winner free digi images!!! I'm still getting used to using this kind of an image - one that comes on the computer that I can resize and print instead of stamping.
Drum roll please........ our sponsor is......
Sparkle N Sprinkle...............
they are offering up to $15 in digi images !!!!
Okay now it's time to show you my vision. This image reminded me of a stained glass window and I wanted to try to make it look like that. I have a dear friend that helped me figure this out and I have to say that I believe it turned out just lovely!!! Thanks so much Carole for the help and especially the moral support.
To make the stained glass window
1. I used a piece of Stampin' Up Multipurpose Adhesive (it is double sided sticky) put it on the velum and then ran that through the copier printing my image on the Adhesive side.
2 . Using an exacto knife I cut the sections off color by color and added the glitter, burnished with finger then brushed off. The more pieces I cut off and added the glitter to the better it looked!!
3. I almost didn't do this next step...I didn't want to ruin it!!! BUT when I did, it really made it look so much more like the stained glass window that I am really glad I did!!! I used a sharpie marker and drew around each section, (I did have to clean the tip of the marker off a few times since I was drawing over the glitter.)
I took this picture later in the day and the only light was behind it. Thought the lighting really made the stained glass window glow!! What do you think? Thanks so much for stopping by and if you would be so kind to leave me a message I would REALLY appreciate it!! Now it is your turn to become creative, show us how you interpret our Sparkle challenge!!!
Drum roll please........ our sponsor is......
Sparkle N Sprinkle...............
they are offering up to $15 in digi images !!!!
Okay now it's time to show you my vision. This image reminded me of a stained glass window and I wanted to try to make it look like that. I have a dear friend that helped me figure this out and I have to say that I believe it turned out just lovely!!! Thanks so much Carole for the help and especially the moral support.
To make the stained glass window
1. I used a piece of Stampin' Up Multipurpose Adhesive (it is double sided sticky) put it on the velum and then ran that through the copier printing my image on the Adhesive side.
2 . Using an exacto knife I cut the sections off color by color and added the glitter, burnished with finger then brushed off. The more pieces I cut off and added the glitter to the better it looked!!
3. I almost didn't do this next step...I didn't want to ruin it!!! BUT when I did, it really made it look so much more like the stained glass window that I am really glad I did!!! I used a sharpie marker and drew around each section, (I did have to clean the tip of the marker off a few times since I was drawing over the glitter.)
I took this picture later in the day and the only light was behind it. Thought the lighting really made the stained glass window glow!! What do you think? Thanks so much for stopping by and if you would be so kind to leave me a message I would REALLY appreciate it!! Now it is your turn to become creative, show us how you interpret our Sparkle challenge!!!
Thursday, July 23, 2015
Stencil and Mask challenge
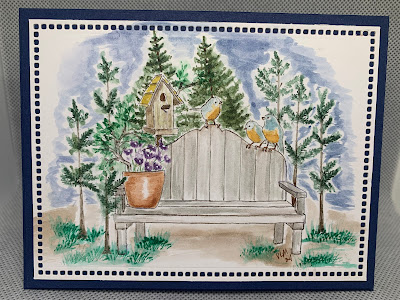
Hello and thank you for stopping by, today I have a masked, stenciled, sponged card for you. Sounds like a mouth full, right. :0) This is a new challenge site for me... Crafts 4 Eternity I found it when I was looking at someones blog spot page. I took a few pictures so you could see how I masked and sponged this card hope they show you what to do if you don't already know how that is.
Challenge #235 Stencils and Masks - Vicki's Vision
Here is the image, stamped then masked. I
used a full adhesive sticky note to stamp on, cut it out then covered stamped image. I know that looks like a lot of cutting but wait if your careful when you take it off it can be used again and again. SO one cut multiple uses!!
Challenge #235 Stencils and Masks - Vicki's Vision
Here is the image, stamped then masked. I
Here it is with the sponging mostly done and the mask removed. just added a little more along the horizon line and grass area. next step to color bench.
I finally decided to add this stenciled image on the base of the card. This is a stencil I have had for years and years and thought it would go well with the bench scene.
Thanks for taking a peek at my Vision, I love to make sponged cards, they look hard but are NOT. at least I don't think so. Today I'm headed to the Green Bean patch and all that brings. My shelves in the basement are in dire need of them this year. I usually put up around 80 quart and I only had about 9 left from last years canning. Have a wonderful God filled day whatever you have on your schedule.
Wednesday, July 22, 2015
Alphabet Challenge
Welcome! I'm so glad you stopped by, After working away from the home for 6 of the last 7 week days, then on Sat. picking, snapping, and canning 21 quart of green beans. I was ready to do some stamping!! Does my house need attention.....Well...... can I plead the 5th?!! :0)
Some of you may know that I am on the Design Team for Creative Card Crew. Mari is the owner and I was checking out her blog today and ran across a couple challenge sites that caught my eye. I'm entering a card in the Alphabet Challenge blog. The letter and challenge this fortnight is K for Kind Thoughts. Every two weeks this changes (previous was J for jewels).
I have been wanting to do something with this new Hostess Stamp set from Stampin'Up (I'm a demonstrator if you need anything I could help you with that :0). The sentiment is from another new set.
Do you have a friend or relative that you enjoy being with but live far apart and don't see each other very often? I do, a sister. The sentiment on this card outside and inside says it all!! (Wonder if Beth will be seeing this before she gets the card in the snail mail.)
I took some pictures of the step by step when making this card so if you look below you'll see that. (Be sure to leave a comment if you want to see more tutorials)
K for Kind thoughts (be sure to look at the inside of the card for the finished thought)
Picture and written tutorial:

Finish the card. Added a pink ribbon (to cover a smudge) and some signo white to the stamens of the flowers, put focal image on a piece of black then popped all up on card base of Soft Sky. Well that's it wasn't hard maybe just a tad time consuming- I guess I could have used the heat tool to dry things quicker but I was doing laundry while I stamped. (maybe I didn't have to plead the 5th??? tee hee)
If this tutorial was helpful PLEASE leave me a comment - anyone doing this knows that it is time consuming and I really would like to use my time well. So if you gained from this and would like to see more, let me know.
I Love sharing my Visions!!! Today I'm off to the corn patch (should already be there but wanted to finish this). Have a great day!
Some of you may know that I am on the Design Team for Creative Card Crew. Mari is the owner and I was checking out her blog today and ran across a couple challenge sites that caught my eye. I'm entering a card in the Alphabet Challenge blog. The letter and challenge this fortnight is K for Kind Thoughts. Every two weeks this changes (previous was J for jewels).
I have been wanting to do something with this new Hostess Stamp set from Stampin'Up (I'm a demonstrator if you need anything I could help you with that :0). The sentiment is from another new set.
Do you have a friend or relative that you enjoy being with but live far apart and don't see each other very often? I do, a sister. The sentiment on this card outside and inside says it all!! (Wonder if Beth will be seeing this before she gets the card in the snail mail.)
I took some pictures of the step by step when making this card so if you look below you'll see that. (Be sure to leave a comment if you want to see more tutorials)
K for Kind thoughts (be sure to look at the inside of the card for the finished thought)
Inside
Picture and written tutorial:
| when I finished coloring I had to let it dry. |
| water colored butterflies, cut and adhered to card. (I colored 2 thinking I might need then didn't oh well I have on for another project.) |
Finish the card. Added a pink ribbon (to cover a smudge) and some signo white to the stamens of the flowers, put focal image on a piece of black then popped all up on card base of Soft Sky. Well that's it wasn't hard maybe just a tad time consuming- I guess I could have used the heat tool to dry things quicker but I was doing laundry while I stamped. (maybe I didn't have to plead the 5th??? tee hee)
If this tutorial was helpful PLEASE leave me a comment - anyone doing this knows that it is time consuming and I really would like to use my time well. So if you gained from this and would like to see more, let me know.
I Love sharing my Visions!!! Today I'm off to the corn patch (should already be there but wanted to finish this). Have a great day!
Tuesday, July 21, 2015
Cancer Free!!! CCC#92 Banner
It's time for another Creative Card Crew challenge, this one calls for a banner/flag! I made mine a banner for cancer free celebrating!! The image I choose is from a day for daisies (thank you so much) and is called roses for a cause. To all those who have a loved one with some type of this disease I pray that this will become a reality for you!! AND I am hoping and praying that I will be able to send this to my sister-in-law who will be having her 5 year cancer free check up soon!
I copied the image onto Kraft card stock from Stampin' Up then used bleach to paint the image - this made the card stock a pale yellow (be sure the bleach is completely dry! before next step and bleached color changes with other colors of card stock)
I added depth to the roses with copic markers. The green ribbon is the color represented by the cancer type my sister-in-law has. Added some glitter to make the ribbon and words stand out.
Thank you for stopping by, I love to read comments and rarely get to, hint, hint, hint. :0)
Be sure to check out all the other team members creations, and if you would say a prayer for my sister-in-law and all the others who are fighting this disease. (close up of image below)
Our Sponsor and give away....
Close up of image;
Just thought I'd go ahead and add this picture also I colored the imae again and will use it on a card. When I added the glitter glue it turned some of the ribbon dark not sure I like that but think the roses had more deep color in this one. maybe it just looks darker since the background is white>?
I copied the image onto Kraft card stock from Stampin' Up then used bleach to paint the image - this made the card stock a pale yellow (be sure the bleach is completely dry! before next step and bleached color changes with other colors of card stock)
I added depth to the roses with copic markers. The green ribbon is the color represented by the cancer type my sister-in-law has. Added some glitter to make the ribbon and words stand out.
Thank you for stopping by, I love to read comments and rarely get to, hint, hint, hint. :0)
Be sure to check out all the other team members creations, and if you would say a prayer for my sister-in-law and all the others who are fighting this disease. (close up of image below)
Our Sponsor and give away....
Prize: $12 gift voucher
Close up of image;
Friday, July 17, 2015
CASED card layout
I saw this card on Pinterest and loved it. My gentleman Pheasant Hill stamper asked for something patriotic he has never requested anything before and I wanted to do this for him but some of the others were not excited about that theme since we weren't getting together till the 7th . When I saw this card layout I knew that it would work for both, patriotic and general for birthdays. They love using the big shot for embossing and cutting. I had the stars pre-punched since I only had one punch and they have a hard time punching by hand. Everyone ended up liking it and many did use for a manly birthday card.
Wednesday, July 15, 2015
Sunshine is needed!!
We have had so much rain here in Ohio that I don't know if my garden will even do anything. I was wanting some sunshine so I used this sentiment that I have had for many years. (non stampin' up) Last week I had this card designed for the Pheasant Hill stampers. It was a simple and quick card since I had all the punching done for them. Many don't have the strength to use the punches so I usually go ahead and punch what is needed. They loved it and many changed the wording to use for their need.
Subscribe to:
Posts (Atom)
Just because cards
I have been wanting to use some of my Art Impression Stamps lately and decided that today was the day. I used a new set, It’s one of the wa...
-
SIBH= Stamping Inkspirations Blog Hop Yep it's that time again, our Feb. Blog Hop with what else but a Love theme! I have two really di...
-
A new year and a new blog hop the second Saturday of each month. This is going to be so much fun and I am so hoping I can do this every m...
-
Welcome to the first blog hop of the year for The Joy Of Sets! Thank you for hopping over. I decided to make a gift bag and card a...