Tuesday, June 23, 2015

Tea anyone? CCC #90

      Hey there it's that time again!  What time you might ask, well I'll tell you.  Time for another Creative Card Crew challenge!!!   For the next 2 weeks we want you to play along with a specific challenge and then at the end one winner will be randomly chosen and one designer will choose their top three, all will be displayed on the home page for the next two weeks.  Sooooo what are you waiting get busy and have fun!

Our next challenge is a CAS challenge =  Clean and Simple.
           I know! what is simple to one may not be to you but you are the creator and if you think it is simple then you can play.  Clean just means not a lot of fluff and extras.  Our sponsor  this month will be..........................Imagine That!  and the random winner will receive 3 digi's

Picture
new logo

Okay now that you know all that how about I show you my CAS project.  I did not make a card I made a little bag.  It really is simple!!  
Have you ever felt like life in general just gets to busy sometimes? There always seems to be something that needs done and the people we care about are put on the back burner.  I have a dear friend that I made this for, we enjoy getting together and having tea while we visit. Summer brings more entries on the To Do's lists.  I have been feeling like we need to visit and will be stopping by her house with this little gift and a nudge - letting her know we need to get together.   :0)

Now I did say that this is a simple project, I used Stampin' Ups Mini Treat Bag Thinlits Die.  Just copied the image onto some Designer Paper, colored in the flowers and leaves, cut with the big shot, put the bag together added the tea bags and tada it is ready to deliver.  I took some pictures of the step by step, if your interested.
       Thanks Imagine That for the fun teapot and cups, I know my friend will like this image and the sentiments that came with it are great!  That's my Vision, hope you can see how very clean and simple this was to make and like I said above give your hand a try!  
this is the thinltit for the bag-  cut one of each (this come with many other dies that can be used for decorating)
two pieces cut ( I copied the image onto the DSP before cutting)
Colored with markers after putting 2 pieces together
adhere two side pieces in the back(they overlap) and then adhere the bottom up

Monday, June 22, 2015

Sprinkles of Life #4

Hello all you bloggers, thanks for stopping by (I hope someone has even though I haven't had many comments).  I really wanted to use this set again and after looking on Pinterest I came up with this card which is a combination of many.  I took the card design from one card that I saw, I took the lattice from another card I saw and then drummed up the rest myself. This is what I came up with after all the inspiration that I looked at.......  Vicki's Vision


This is the second card that will be made at my Stamp Camp on June 23.  If you are interested in how this is made that is the place to be - Tuesday at 1 p.m.

I am probably prejudice but I think this turned out really cute,  it isn't hard just a little bit time consuming with punching all the flowers.  Anyone want to guess how I made the lattice and clouds?   Leave me a comment and everyone who answers correctly will have their name put in a pot and I'll draw one out to win a prize.  I will close this on the 30th of June happy guessing!! ( Now  remember you can't win if you don't leave a comment!)

Friday, June 19, 2015

Floral Wings and Butterfly Thinlits

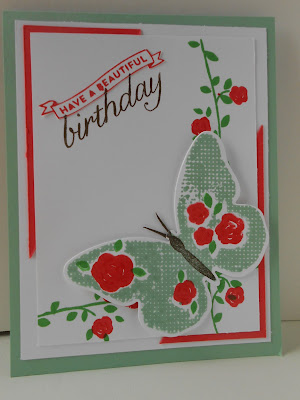
I have 2 card to show you today, I made them both at the same time using the same In Colors from Stampin' Up.  Mint Macron (I've used this color numerous times in past posts) and paired it with Watermelon Wonder, and it is a wondrous color!  This is one of the new Hostess sets called Floral Wings and the new Bold Butterfly Framelits Dies works with the butterfly image. (this framelit works with the Watercolor Wings stamp set and coordinates with the butterflies thinlits dies also)  I love how Stampin' Up is incorporating more of their framelits/thinlits shapes in more than one stamp set!!

If you have this set or the Watercolor Wings let me give you a tip - Stamp the butterfly body after it has been cut with the Die. I found it super easy to do since these 2 sets are Photopolymer (clear).

Well I hope you like my cards, I will often look at the Pinterest site for inspiration and that is where I saw some cards very similar to this last card.  Have a wonderful day and I'll be seeing you again  :)
I hope.  Leave me a comment on which one you like best, I sure would appreciate it. Vicki


Thursday, June 18, 2015

Watercolor Wings #2

Well here I am again with another Watercolor Wings I was playing around with odd substances for textured stenciling -I think this turned out really neat but then I am the creator.  Don't forget to look around your house for anything that might make a neat background.  (see picture below for my "stencil")
     Stenciled the back ground with  Sky Blue then stamped the butterfly. (since I was using a dark color for the butterfly I didn't worry about going on top of the back ground.) used only 2 layers for the butterfly, not sure you can tell though.  I first stamped in Blackberry Bliss then took one of the layers and added dazzling details with the tip then stamped this gave just part of the butterfly wings a sparkle. (be sure to clean off stamp quickly if doing this as the dazzling diamonds is like a glitter glue and you wouldn't want to ruin your stamp.) Adhered the top layer onto a blackberry bliss layer then used dimensional to pop that up on the sky blue card base.  I like the simplicity of this card!

          I'm not sure where this material came from but it made an interesting back ground textured look for my card.  As I said don't be afraid to try new things often times an opps can turn into an Ohh-La-La!!!  Forgot to tell that I used a watercolor brush and a gray to lightly add color around the butterfly. I felt this made the butterfly pop out a little.  thanks for stopping and any comment would be greatly appreciated!

Wednesday, June 17, 2015

Watercolor Wings 1

Oh my another new Stampin' Up set, and this one has been sooo much fun to play with!!!!.      :0)              It coordinates with the Butterfly Thinlits and stampin' up came out with another one that goes right along with the old one.  The new stamp set and thinlits actually come as a bundle which means you save money when you buy like that!

     I used the new in color Mint Macaron on this, it is such a nice color!!  My background needed just a little texture so I punched flowers from Petite Petals and adhered them to the top portion.  The body, antennae, candy dots, and sentiment are all in Early Espresso ink or card stock.  
    There Will be more on this stamp set, come again to see more of Vicki's Visions.  I love to read comments let me know what you think.

ps: (remember these from when we used to write letters?)For Your information: I did not spell Mint Macaron WRONG that is how Stampin' Up spelled it. Why? I don't know!!   ;0)

pps:  anyone coming to my class on Tuesday the 23rd?  you just looked at one of the cards we will be making that day.


Monday, June 15, 2015

Sprinkles of Life #3

I decided to do something with the tree.  If you look closely the cloud and the leaves on the tree are the same shape and are on the coordinating punch, the trunk also is on the trunk.  This set has many different images that can be used with the punch for the "cloud" image.  Along with this card you could see a few other uses in the previous postings under Sprinkles of Life.
The tree leaves were stamped on Velum, the middle one I colored the velum with a light green, not sure which I like better.  What do you think?  Have a great day.

Thursday, June 11, 2015

Sprinkles of Life #2


Thanks for stopping back here is another card or rather three cards that are similar but different, which one do you like?


Made these for three special people in my life, they will get them someday.   :0)


Wednesday, June 10, 2015

Sprinkles of Life #1

I'm behind a few days, sorry. I ended up picking strawberries and making jelly on Monday morning then working in the garden WEEDS!!!  sometimes I wish I knew what they were created for :0)                   I wanted to show you some cards with this new stamp set from Stampin' Up It has 22 photopolymer stamps and is the Ronald McDonald House set for this year.  Stampin' Up designs a new one each year and gives a $3.00 donation for each set that is bought.  This as you know helps the children and their families.
       My card group from Tuesday made this card - I used colors so it could be used for male/female.  There are 3 colors from the new 2015-2017 In Colors, Delightful Dijon(layer, cone and flag), Cucumber Crush(in the striped piece, and flag) a little Watercolor Wonder(cherry on top)  The ribbon at the top is also new comes in each of the new In Colors this one is Cucumber Crush. We hand cut the cone base.   I punched a chocolate chip piece that is the same as the white ice cream then trimmed it down to make it look like chocolate syrup dripping down, doesn't it look yummy?

This set has a hand held punch it cuts the cone topper which doubles as a cloud and tree topper,          a tree, mini flower, bird, cherry/apple, pear/leaf . I love stamp sets that come with a punch or die.  Fussy cutting(we had to with the cone base) is ok sometimes but quicker with punches and dies especially with really intricate pieces.  Come back and you will see some cards made using the other pieces in this set and with the punch.  Have a great day!   Vicki

Tuesday, June 9, 2015

White on White = Wedding

I'm so glad that our challenge this time was white on white I have a wedding to go to and this theme will fit it beautifully.  Our sponsor is
                                                                                         
                                                            
The white on white theme can be such an elegant design, great for any occasion.  Here is what I came up with for my wedding card.  (We as the DT were told that our image could be colored but nothing else)   With that in mind I did very little coloring and a lot of embossing.

                                                 
I started out with the Perfect Polka Dots Embossing folder from Stampin' Up (retiring June 3)
Then I cut the Wildflower Corner from Memory box and added on top of the embossed card, the Ribbon on the left edge-it is from Recollections.  
Stamped the bride and groom - Stampin' Up (retired Best of Brides and Babies)  colored the grooms suit, their hair, and the flower.   Stamped this again lined up the brides dress on one of  the Delicate Designs embossing folders (there are 2 in the set and they are narrow for edges) from Stampin' Up, cut it out and added foam tape behind to give the aperrance that her dress is full and flowing. I don't think you can see in the picture but I did added some Glitter Clear Wink of Stella to her dress and veil.  Cut with the Lacey Ovals from Spellbinders and popped it up on the card.

That's it what do you think?  Are you going to give it a try?  I sure hope that my entry will encourage you to make something for this challenge maybe even a wedding card then you'll have one done for the next wedding you are invited to.  I didn't with this card but often will make more than one so I can put a card back to have for the next time I need.  Have a great day, summer is here!!!  I love to hear from visitors and will read every comment. Bye for now from Vicki's Vision.

Sunday, June 7, 2015

Pheasant Hill stampers #1

Good day to you, welcome to my little place in Blogging Space.  You've come to Vicki's Visions and I thank you for stopping by.  Today I have a card for you that my Pheasant Hill group will be making on Tuesday and I'll post the second card they will make on Tuesday.  I was requested to make a "manly card".  Pulled some OLD Stampin' Up sets and this is what I came up with.


Recipe:
stamp sets:  Nuts and Bolts; Alpa Shadows, It's Your Birthday
Ink;  Lost Lagoon, Memento Tuxedo Black
Card stock; Very Vanilla. Lost Lagoon
Other;  Retired Stampin' Up DSP,  Stampin' Dazzle silver (for tip of drill), distressing tool for the vanilla panel.  Dimensionals for the drill to give it a little lift. the drill is cut with a die I picked up from Tessier Crafts.

Now don't forget to come back tomorrow I used a new Stampin' Up set for card No. 2  It is a fun one and I have enjoyed playing with it and will be showing more the rest of the week not just tomorrow.  Stampin' Up give a donation to the RMHouse for each set that they sell.    I love getting comments and read every one, so if you would please let me know what you think of this manly card.  :0)

Just because cards

 I have been wanting to use some of my Art Impression Stamps lately and decided that today was the day. I used a new set, It’s one of the wa...