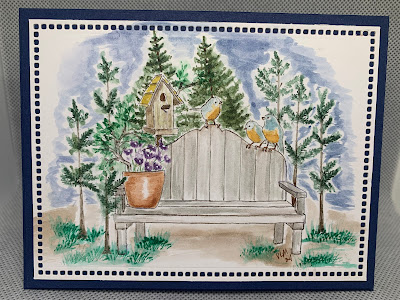
One of my enjoyments with card making is water coloring. I think it is such a relaxing way to make many different looks. Here I embossed the image with white and then water colored . I love the softness of this, you can get different shades of the color your using just by adding more water. If you don't have actual water colors like I used with this card, I've also done water coloring with a stamp pad and markers so don't let that stop you. Just take a water based marker (Stampin' Up/ Crayola/Tombow) and scribble some color on a white surface -like a cool whip lid- and then add water. With a stamp pad just squeeze to get ink on the lid then add water or you could swipe the pad on a cool whip lid to transfer the ink. If you've used the lid of your stamp pad and have a lot of water in it I'd probably wipe it off with a paper towel, if it's not real watery just leave it for the next time you decide to do some water coloring it will dry but you can re-activate it with ..... water 😊
I added the Hello sentiment by cutting it three times and layering it so it pops a bit. Oh yes that was Augusts technique challenge - add dimension without using pop dots or adhesive foam tape.
This card is a fun one to make - it is different, will fold flat for mailing yet has a nice base for the recipient to set it up.
Gray Piece is cut 4 1/4 x 11 score it at 5 1/2, 7, 9, 10 1/2
Fold and burnish all score lines in the same direction.
To assemble this base piece, lay your card stock on a flat surface up to the 7" fold line. Now add double - sided tape to the small 1/2" end section, remove the backing and fold under to adhere to the back of the card. This will form a "box" on the bottom of the card so it will sit on a table. When this is mailed the card needs to fold up on the 5 1/2 score line to fit in regular size envelope.
White decorated piece
5 1/2 x 3 1/4 scored at 3 1/2, 5
The large 3 1/2" section is my main section for stamping, this is adhered to the "box" section on the card at the 7" score line, it will extend up above the box. Fold at the 3 1/2 and 5" lines and then add adhesive to the small 1/2 inch section to attach to the card base. Be sure to lay the card flat, folded at the 7" score line and fold the 1/2 back onto to the (gray) base of the card. ( Mine is about a half inch from the top of the card when folded flat in the middle -5 1/2- for mailing.)
Hope that is NOT as clear a mud. It really isn't hard and is a different type of fun-fold card.
The white piece can be any size or shape as long as you remember that the piece needs one end scored with the same width as your "box"(mine is 1 1/2") and a small section that will adhere to the card base (mine 1/2"). You also don't want to make it to much taller or it will fold up over the back of the card when it is laying flat to mail (mine is about a 1/2" shorter than card base when folded).
I add a blank panel onto the back of the card for more space to write my personal message.


Clever card, Vicki! I've never seen this fold before. -Donna
ReplyDelete