Tuesday, October 20, 2015

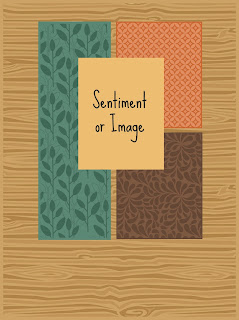
Try Stampin' On Tuesday challenge #241

Hello, I am excited to tell all of you who follow me that I've been accepted to another Design Team!! I'm really excited about this as I'll be able to use stamps and that is my passion.

Try Stampin' On Tuesday, every week they have a new challenge with two teams taking turns posting projects.  I'll be on Team B and posting every other week.  There will be a sketch and a suggested theme for you to use if you desire.  It can be a challenge to use what's suggested but that is how we become better, by the challenge to not always do what we are most comfortable with.

Here is the sketch for you to try:
Theme "Leaves - three D"

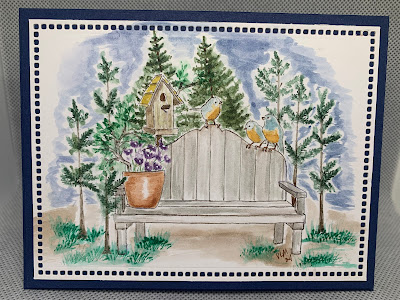
Here is my Vision;
I have used all Stampin' Up products although some are retired. Now it is your turn to try this lovely sketch and theme. I would love to hear from you if you would be so kind as to leave me a comment or if you have a question I would be more that happy to answer it. Have a wonderful day.  Vicki

Saturday, October 17, 2015

Do you love discounts? I Do!

Well here is the discount: If I can help you with anything, just let me know!
Beginning October 19th, Stampin’ Up! is offering 15% off the retail price for all stamps in the Annual and Holiday Catalogs!  Now is a great time to get your wish list out and make some additions!  Here are the details:
  • All regular priced stamp sets will be discounted 15% off the retail price from Oct 19-23.  This includes stamps from the Annual Catalog and the Holiday Catalog.
  • Bundles, rotary stamps, host sets and clearance rack items are NOT INCLUDED.  
  • The 15% off stamp sets can be included as part of a Starter Kit (the sale prices will be reflected in the Starter Kit)
Get ready for the sale:
catalog

Annualcataloguntitled

Don’t forget the extra Stampin’ Rewards, too!
Demo_HostRewards_Header_10_9_2015_NA

Friday, October 16, 2015

Window

I have created another window card, have I told you that I really like this new die from Stampin' Up?!!  I wanted to do an outside looking inside with this one and showcase the beautiful wreath hanging on the wall.  But the window wasn't big enough so I extended it.  Had to do the same with the window box as I wanted that also and then shutters for the window.  Gray background has the brick embossing folder used on it and then sponged a little bit.  The window box has a festive ribbon with some pine cones that I made with a small flower die from Impression Obsession.  What do you think of my vision?  I've made quite a few Christmas cards this year, if I keep it up I might have enough done to send all the family a different card.
Thought I'd enter this Vision in a challenge (or two).


Tuesday, October 13, 2015

Creative Card Crew #98 Ribbon

Hello again, today is the Tuesday for the next Creative Card Crew challenge!!  We are looking at the theme of Ribbon for the next two weeks.  I will say this is for your interpretation, I used a Jute type string/ribbon.

                         
13 October 

Sponsored by

Prize: $12 Gift Voucher

I made an easel card, I think they are so much fun to send as the receiver can sit them up and look at them.  I thought this image from our sponsor was so great for this time of year with the pumpkins.  I have an Aunt who will be getting this card.  She just had double knee replacement and I'm sure she will be flying again soon.  :0)
I colored this with copic markers, still not a pro with them but enjoy using them.  


Thanks for stopping by, now remember you need to join us and make a card, enter it on the blog and you may be the winner of the random selector.  Don't wait to long 2 weeks seems to fly by these days.
Have a great day AND if you could, or would please leave me a comment, I read each of them and love to hear from you.  Vicki

Monday, October 12, 2015

Challenge but it's not Tuesday! tee hee

Decided to try my hand at a challenge over at Try Stamping on Tuesday, but it is Monday. Also over at Can you case it there is a similar challenge that this card works for. Both challenges wanted something spooky or for Halloween.

I found this stamp set on my shelf (retired Stampin' Up) and thought that the little ghost and the spooky/Halloween themes would go well together.  In following with the sketch (on Try Stamping) I added a jack-o-lantern and the bottom black piece that I embossed only the "spooky" smile.  On the right hand side of the card I used some old DSP from last year (Stampin' Up)  sponged on the cajun craze color and then added the sentiment (also retired Stampin' Up)  The black background is embossed then sponged with a bit of white to help the pattern to show.  I pulled out my scrap ribbons and added to the top of the card, when I got that done I thought it sorta resembled a bat?.?.  Well maybe if you use your imagination.

Okay here is the  sketch and my Vision:


Joining challenges can stretch a person to try new and different sketches and themes.  It helps me not to get stuck in my own little comfort zone.  Thanks for stopping by and looking at my Vision and remember you can play along, just click on the names below and it will take you to the web page for the challenge.  Any comments would be appreciated.

try stampin on tuesday
can you case it


Thursday, October 8, 2015

Pheasant Hill stampers #1

         I am early this month with getting my cards decided on and all ready for my Pheasant Hill stampers monthly card class.  Since it is fall I decided to make one of them with leaves.  Now we all know that leaves are not just one color in the fall as they change to their beauty!!  I love seeing the trees in the fall with all their color and wanted to in some small way copy that look.   I decided to use the baby wipe/stamp pad method.  All you have to do is lay a folded baby wipe on something plastic and then add reinkers randomly to fit the size of your stamp.  The ink will blend and become a beautiful stamp pad for your fall leaves. After stamping the acorns I did NOT like them as they did not stand out enough so I stamped the acorns in three different colors and then cut and put together with glue dots so they would look more authentic.
       Thanks a bunch for stopping by Vicki's Visions  have a great day and if you have any question just leave me a comment and I'll get back with you.
Supplies:
Cardstock:  Stampin' Up: Chocolate chip, Very vanilla Retired DSP
Stamp set:  For All Things (stampin' up)
Extras; Decorative Dots Embossing Folder(stampin' up), Rhinestone, Pop Dots, sponge, re-inkers, baby wipes, big shot
Decided to add this to a challenge or two;
http://crafts4eternity.blogspot.com/

Monday, October 5, 2015

Something New!!

I have been playing around with something new to me.  It has been out there but I just haven't jumped on the band wagon till now.  It is called Pergamano and it is mostly done with Vellum.  Oh my my but you can make some really pretty things....if you have a little bit of time.  This is one of those styles of stamping that will take some effort but sooooo worth it in the end.   I want to show you my first attempt, now be sure to get ready to leave me a comment :0)

Well what do you think????!!!!  I thought it turned out 
good.  I used vellum for the the top - flowers, and piece with inspiration saying.  A colored piece under it to help the embossed vellum to show better.  Placed all on a white piece that I textured with the score board.
I did buy a few of the Pergamano tools (there are a lot available).  On this card I only used
3 different sizes of Stylus a 1mm , 1.5mm, and one called hockey stick. The hockey stick resembles its name, it will do larger areas leaving a smoother look.  I also used an embossing pad, this helps give the vellum some flex.(anything soft and yet firm would work)  okay here is how it is done.
1.  Stamped the image of flowers on a piece of Heavy vellum with a white pigment pad (I used Brilliance Moonlight White)   Allow this to dry for about 20 min. Because it's pigment ink and on the vellum which isn't as porus as card stock you'll have to let it sit.
2.  After it is dry, turn the image over onto the embossing pad (stamped side down). Rub with wax paper (helps the stylus to run more smothly).  Trace over the lines in your image with a stylus. It is better to do this lightly then go back and trace again,  a lighter hand is better so you don't rip the vellum by pressing to hard.  
3.  On the card above I followed the 2 steps above then cut out the flowers.
4.  To get the rectangle design above I used a spellbinders die, placed it on top of a piece of my velum on the embossing pad and traced the design with a stylus (no stamping).                                   5.  Assemble card.
NOTE:  Adhering vellum can be tricky to do so it's not visible from the front.  I used Crystal Effects, it seemed to dry clear. I did try to add it behind an area where there was a design.   I have found NO tape type adhesive that don't show. (not even the ones that say they are for vellum)  If you know of something PLEASE leave me a comment and tell me what you've used. Thanks

So what do you think of my newest "vision"?  I love to read comments, if you do leave one, let me know where you can be found and I'll stop by and see you.  Have a blessed week.   Vicki 

Just because cards

 I have been wanting to use some of my Art Impression Stamps lately and decided that today was the day. I used a new set, It’s one of the wa...